Showing posts with label Basics. Show all posts

Tuesday, 8 March 2016

Beginning-with-database-approach-Part 3

0

In Part 2 of beginning with entity framework we did CRUD operation using entity framework. Now, there are few tips for using entity:


How to update your Entity Data Model (.edmx)?


Open your .edmx file >Right click >Select update from database
You will get this window:


If you have added new table, views, stored procedure in database.. Select those and select Finish.
Same to update and delete from model.

Providing Default values?


In SQL we can provide default value, to a column, this default value is not automatically updated to our entity model. So we have to manual add the default value in our entity model also.
Select the table column from entity designer for which default value is to be provided.

Right click on the column>Properties >Default value :- Provide your value


#Stored procedure of SQL behave as function in Entity framework.


Read More »

Wednesday, 2 March 2016

Beginning-with-database-approach-Part 2

0

In our first part we have created our .edmx file with the help of ADO.net Entity Data Model using database approach.

Now, it’s time to start using our entity Framework to do SQL operation.

Before that,  if you are using visual studio 2012 or later, go to solution explorer, find your .edmx file and delete  .tt extension files from there.


After that go to .edmx.diagram file.
Right click > Properties > Code Generation Strategy= None . Change it to Default.


Now we are ready with our entity.


In entity framework, our tables behave as C# class and column as class properties.

Performing Insert operation using entity Framework


On some button click if we need to add that data to our database object, then we follows as  :

First Make an object of your entity, by default it should be as “your database name”Entitites.

Example :

db_OrderMangEntities db = new db_OrderMangEntities();

Now make object of table in which data is to be store,
Syntax :

TableName tbl = new TableName();

After that use this tbl instance to add data to the properties,

Example:

tbl_Vender tbl = new tbl_Vender();
            tbl.VenderName = "Kumar";
            tbl.VenderContact = 656789

When we have provided values to the properties to the table object, its time to save this into database for this,
Do,

db.tbl_Vender.AddObject(tbl);

Here, db is our entity object in which we have tbl_vendor (our table). The “AddObject”(or Add, depending upon your version) is the method provided by the entity to insert data into database.

After adding the data it’s time to tell our database to save our changes, for this write,

db.SaveChanges();


This will add a row to our table with the provided data.

Complete code will look like :


protected void btnRegister_Click(object sender, EventArgs e)
        {
            db_OrderMangEntities db = new db_OrderMangEntities();
            tbl_Vender tbl = new tbl_Vender();
            tbl.VenderName = "Kumar";
            tbl.VenderContact = 656789;

            db.tbl_Vender.AddObject(tbl);
            db.SaveChanges();


        }


Update Object in Entity:


To update any row, we need to first find that row.
For that we have to use LINQ with enitites.
The Syntax will be :


tbl_Vender tbl1 = db.tbl_Vender.Where(i => i.VenderName == "Kumar").First();


Here I am searching with vendorName you can use any property.
After this we will have tbl1 as the object of that row which is to be updated.
Now assign the new values to the tbl1 object.

For Example :

tbl1.VenderName = "Gaurav";

After this just tell the database to save our changes.

db.SaveChanges();

Note , here we are not adding another object to the table as it will add another row, but we just need to update it.


 Deleting object:

Same first we need to find the row to be deleted .

Now write,

db.tbl_Vender.DeleteObject(tbl1);

and then the same save changes to database.


Beginning-with-database-approach-part-3


Read More »

Tuesday, 1 March 2016

Beginning with database approach Part-1

0


This approach could be used with any previously build database, that why known as database model approach. It will help us to communicate with our database, with its predefined functions, and giving our C# code more power in terms of SQL too.


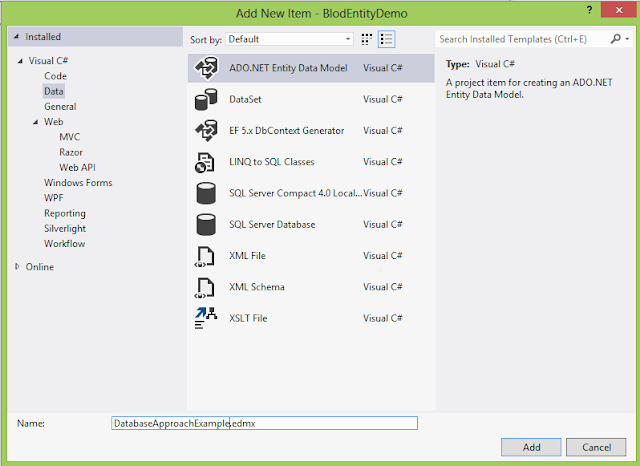
Step 1: Right- Click on the project main file.

Project Name > Add > New Item > ADO.NET Entity Data Model


Provide a relevant Name.

Step 2: Choose Modal Contents :


Select Generate from database > then Next >


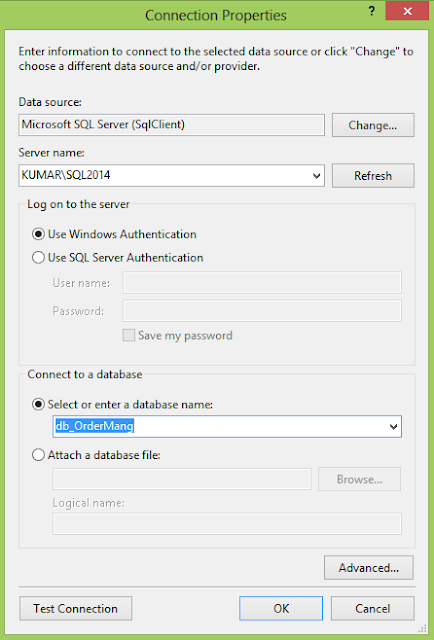
Step 3:  : Make a new Connection to connect to database : (connection string)


Provide your database server name and select the database name, that you want to connect.
Click Next.

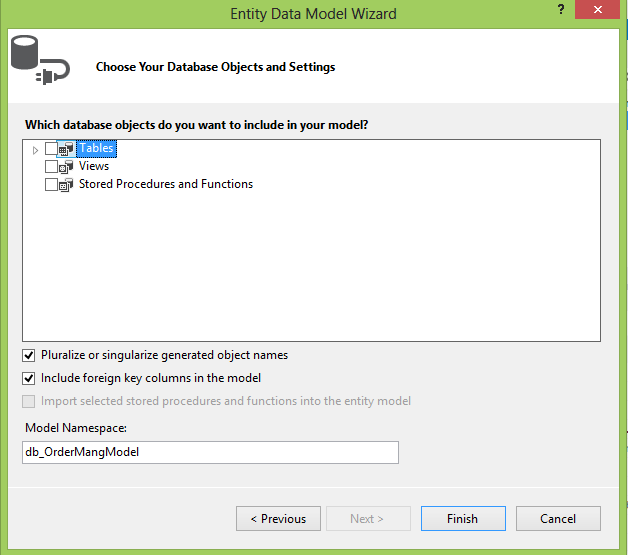
Step 4:  Select the table, views, stored procedure that are required from database, or select all.


Click > Finish.


Your entity Model is created:

You should have got your database tables in GUI format as below :


Read More »

Monday, 28 December 2015

Entity Framework Development Approaches

0

This article is taken from msdn.microsoft.com, it was a necessary part so i provided the content here also.


The Entity Framework is the easiest ORM framework to learn for an ASP.NET developer. Because Microsoft continues to focus ORM development efforts on the Entity Framework, Microsoft and third parties continue to produce new tutorials, videos, and books. Most new tutorials use the Entity Framework even if they are focused on some other technology, such as the latest release of MVC or new model binding features for Web Forms in ASP.NET 4.5.


There are three ways you can work with data models and databases in the Entity Framework:Database FirstModel First, and Code First.


  • Database First
    If you already have a database, the Entity Framework designer built into Visual Studio can automatically generate a data model that consists of classes and properties that correspond to existing database objects such as tables and columns. The information about your database structure (store schema), your data model (conceptual model), and the mapping between them is stored in XML in an .edmx file. The Entity Framework designer provides a graphical UI that you can use to display and edit the .edmx file.
  • Model First
    If you don't have a database yet, you can begin by creating a model in an .edmx file by using the Entity Framework graphical designer in Visual Studio. When the model is finished, the Entity Framework designer can generate DDL (data definition language) statements to create the database. As in Database First, the .edmx file stores model and mapping information.
  • Code First
    Whether you have an existing database or not, you can use the Entity Framework without using the designer or an .edmx file. If you don't have a database, you can code your own classes and properties that correspond to tables and columns. If you do have a database, Entity Framework tools can generate the classes and properties that correspond to existing tables and columns. The mapping between the store schema and the conceptual model represented by your code is handled by convention and by a special mapping API. If you let Code First create the database, you can use Code First Migrations to automate the process of deploying the database to production. Migrations can also automate the deployment of database schema changes to production when your data model changes.

Choose Code First for new development unless you want to use a graphical designer to model database objects and relationships. The Entity Framework designer only works with Database First and Model First. Before you choose Database First or Model First, however, consider how you want to handle updates to the data model after you create the database, and how you want to deploy the database and deploy updates to it. Code First Migrations automates the process of implementing and deploying database schema changes that result from data model changes. The advantages of Code First Migrations might outweigh the advantages of the Entity Framework designer.

Read More »

Saturday, 21 November 2015

Extension Methods in C#

0

Extension methods enable you to "add" methods to existing types without creating a new derived type, recompiling, or otherwise modifying the original type.

How Do We Create Extension Methods?


Step 1: Create the Static Class

Step 2: Create the Static Method and give any logical name to it. 

Step 3: In the Extension Method Parameter, just pass this along with the object type.


Implementation :


If we have a third party class (Important), which is not accessible to developer named "Class1".
and you want to create an extension method to that class ( for example a method that return "This is extended method") then, according to our steps :


Create a static class :

public static class Extension{}


 Step 2 & 3: 


We need an extension method to mark the function as static (so that it can be accessed at any time without the need for declaring anything) and secondly, mark the first parameter with the this keyword. This keyword basically tells the CLR that when this extension method is called, to use "this" parameter as the source. 
public static class Extension
{  
public static string ReturnString(this ClassNeedToBeExtended classObj) 
{ 
return "is used to call the extended method"; 
} 
}


How to use Extended Method?


Its quite same like using the normal methods of the class, just make an object of the class and now you will have access to our extended method too.

ClassNeedToBeExtended class1 = new ClassNeedToBeExtended();
class1.ReturnString();


Point to be considered :


Extension methods are a special kind of static method, but they are called as if they were instance methods on the extended type.

 Extension methods are only in scope when you explicitly import the namespace into your source code with a using directive.

 If you create an extension method with the same name as another method in that type, the compiler will bind the method call to the native method, not any extension. An extension method is only called when there is no native method found.


Read More »

Wednesday, 18 November 2015

Threading Overview in C#

0


What threads really are ?


A thread is a sequence of instructions executed within the context of a process. One can also say threads are the smallest possible part of the process that can be handled or controlled independently by a scheduler.

Multiple threads within a process share the memory, execution instruction, context data and other system resources.


Multi-threaded Processes :


Creating a process includes starting the process running at an instruction point. This is normally known as the primary or main thread.


If we want our process to do more than one thing, like query a Web Service and write to a database at the same time then multi-threading can help us.


We can split a process to share the time slice allocated to it with different thread.
The concept of spawning new threads within the same process is called free threading.


Code Time


Starting and making  a thread 


Step 1 : Creating a thread

using only with thread class :

Thread workerThread = new Thread ( function_name_for_which_thread_is made );


 using ThreadStart Delegate

The ThreadStart delegate works similar to  above. It enables starting a thread without passing any argument to the target method.


Thread t2 = new Thread(new ThreadStart(function_name_for_which_thread_is made ));


 Step 2 Start the thread : 


workerThread.Start( );
You can also have a parameter thread start, then pass the required value to the function at the time of thread start.

workerThread.Start(50);

Now, if thread need its CPU time to wait for a resource, or for some other reason, so the programmer may choose to make the thread sleep, which result in the thread being packed in the TLS and provide time for other process meanwhile making for code more efficient. This is simply done by :


Thread.Sleep(duration_in_milliseconds_for which you want your thread to sleep);


 Example :


Thread.Sleep(5000);

 // It will make the thread sleep for 5 seconds.


Putting altogether :

using System; 
using System.Threading;
namespace threading
{
class student
{
public void thread1()
{
Console.WriteLine("First thread of student class and method thread1 is running");
Thread.Sleep(1000);
Console.WriteLine("First thread of student class and method thread1 has ended");
}

public void thread2()
{
Console.WriteLine("Second thread of student class and method thread2 is running");
Thread.Sleep(2000);
Console.WriteLine("Second thread of student class and method thread2 has ended");
}

public static void Main(string[] args)
{
student st = new student();
Thread = new Thread(new ThreadStart(st.thread1)); //creating thread T1
T1.Start(); // Starting thread T1
Console.WriteLine("First thread T1 started");
Thread T2 = new Thread(new ThreadStart(st.thread2));//creating thread T2
T2.Start();// Starting thread T2
Console.WriteLine("second thread T2 started");
Console.ReadLine();
}
}
}


Some Important Methods of Thread Class 


  • Suspend:-It is used ,for suspending a thread.
  • Join:- Block a thread until another thread has terminated.
  • Resume:-It is used for resuming a thread which has been suspended earlier.
  • Interrupt:-It is used to interrupt the thread,which is in the wait sleep join state.
  • SpinWait:- It is used to make a thread wait the number of times specified in Iteration parameter.
  • Abort:-It is used to terminate the thread as soon as possible.
  • Interrupt:-It is used to interrupts the current thread from a suitable wait period.
  • start:- start the thread.


Read More »

Saturday, 7 November 2015

Delegate In C# With Example

0

Delegate is a type which  encapsulate a reference to a method inside a delegate object. Delegate are object-oriented, type-safe, and secure.

If this is our method :

public int add(int a, int b)
{
return a + b;
}


 To make reference to the method (add). 

 First we need to define the delegate to make its object (obvious).


Declaration :


Syntax

public delegate type_of_delegate delegate_name(  );

 It is declared globally i.e outside all functions.


public partial class Delegate : System.Web.UI.Page
{
public delegate int delegate_add(int a, int b);

protected void Page_Load(object sender, EventArgs e)
{
}


Using the delegate at a particular function, as said by passing the reference of the function(add) to the object of the delegate (AddUsingDelegate).


 protected void btnAdd_Click(object sender, EventArgs e)
{
delegate_add AddUsingDelegate = new delegate_add(add);
int result = AddUsingDelegate(int.Parse(txtNo1.Text), int.Parse(txtNo2.Text));

}


Putting Altogether 

public partial class Delegate : System.Web.UI.Page
{
public delegate int delegate_add(int a, int b);

protected void Page_Load(object sender, EventArgs e)
{
}

protected void btnAdd_Click(object sender, EventArgs e)
{
delegate_add AddUsingDelegate = new delegate_add(add);
int result = AddUsingDelegate(int.Parse(txtNo1.Text), int.Parse(txtNo2.Text));

}
public int add(int a, int b)
{
return a + b;
}
}


Advantages :


Encapsulating the method's call from caller
When we are using delegate it provide exact encapsulation as we are using a separate class. Here our method call is completely encapsulated


Effective use of delegate improves the performance of application
The performance is improved due to encapsulation and due to the fact that it is decided at run-time which method is called.

Anonymous" invocation
Property of a delegate is that it does not know or care about the class of the object that it references. Any object will do; all that matters is that the method's argument types and return type match the delegate's. This makes delegates perfectly suited for "anonymous" invocation.


Read More »