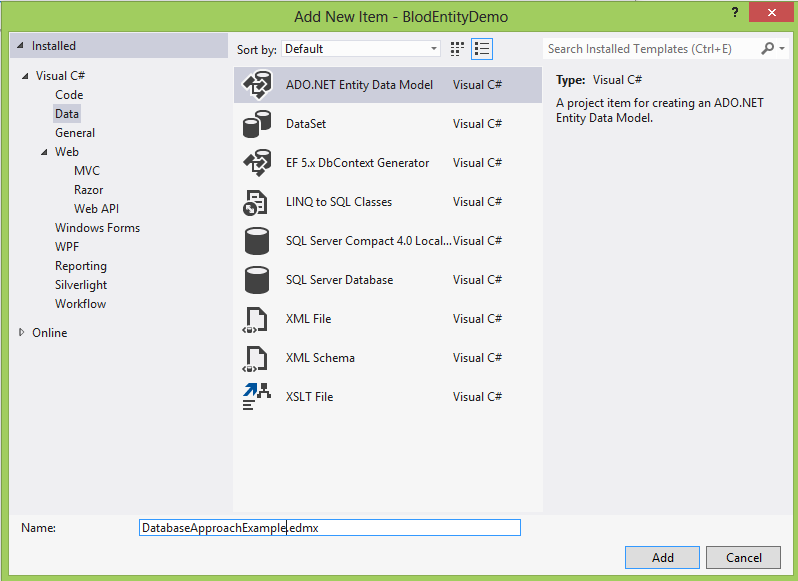
Angular
Material is the reference implementation of Google's Material Design
Specification. This project provides a set of reusable, well-tested,
and accessible UI components based on Material Design.
To
use Angular- Material, required Angular files are :
angular-material.min.css
angular-material.min.js
angular.min.js
angular-animate.min.js
angular-aria.min.js
angular-messages.min.js
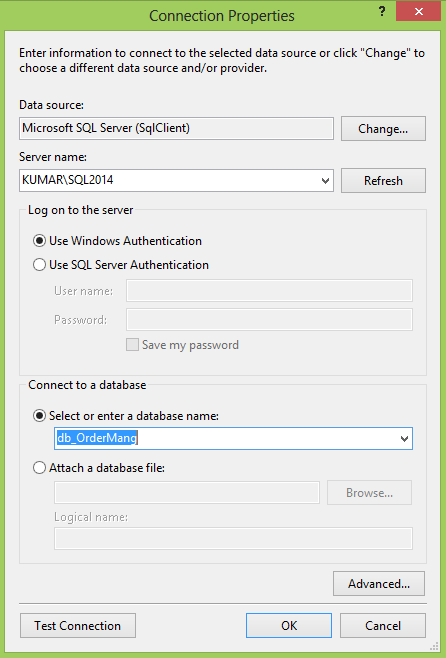
CDN
:-
- https://ajax.googleapis.com/ajax/libs/angularjs/1.4.8/angular.js
- https://ajax.googleapis.com/ajax/libs/angularjs/1.4.8/angular-animate.min.js
- https://ajax.googleapis.com/ajax/libs/angularjs/1.4.8/angular-aria.min.js
- https://ajax.googleapis.com/ajax/libs/angularjs/1.4.8/angular-messages.min.js
- https://cdn.gitcdn.link/cdn/angular/bower-material/v1.1.0-rc1/angular-material.js
Angular
material provide us with its own tags that help us to perform DOM
Operation in an easy fashion. One of such tag is md-autocomplete.
md-complete
tag
md-complete
tag has its child tag
<md-item-template>
: In this the search items results are shown.
<md-not-found>
: Here text is provided when search does not match.
Our HTML Page :
<div ng-controller="AutoCompleteController as ctrl" layout="column" ng-cloak="" ng-app="MyApp">
<md-content class="md-padding">
<form ng-submit="$event.preventDefault()">
<p>Use <code>md-autocomplete</code> to search for matches from local or remote data sources.</p>
<md-autocomplete md-selected-item="ctrl.selectedItem" md-search-text="ctrl.searchText"
md-items="item in ctrl.querySearch(ctrl.searchText)" md-item-text="item.display" md-min-length="0" placeholder="What is your favorite US state?">
<md-item-template>
<span md-highlight-text="ctrl.searchText" md-highlight-flags="^i">{{item.display}}</span>
</md-item-template>
<md-not-found>
No states matching "{{ctrl.searchText}}" were found.
<a ng-click="ctrl.newState(ctrl.searchText)">Create a new one!</a>
</md-not-found>
</md-autocomplete>
<br/>
<p>By
default, <code>md-autocomplete</code>
will cache results when performing a query. After the initial call
is performed, it will use the cached results to eliminate unnecessary
server requests or lookup logic. This can be disabled above.</p>
</form>
</md-content>
</div>
Our JS Page:
'use
strict';
angular
.module('MyApp',
['ngMaterial',
'ngMessages'])
.controller('AutoCompleteController',
AutoCompleteController);
function
AutoCompleteController() {
var
self = this;
self.states =
loadAll();
self.querySearch =
querySearch;
function
querySearch(query) {
var
results = query ? self.states.filter(createFilterFor(query)) :
self.states;
return
results;
}
function
loadAll() {
var
allStates = 'Alabama,
Alaska, Arizona, Arkansas, California, Colorado, Connecticut,
Delaware,\
Florida, Georgia,
Hawaii, Idaho, Illinois, Indiana, Iowa, Kansas, Kentucky, Louisiana,\
Maine, Maryland,
Massachusetts, Michigan, Minnesota, Mississippi, Missouri, Montana,\
Nebraska, Nevada, New
Hampshire, New Jersey, New Mexico, New York, North Carolina,\
North Dakota, Ohio,
Oklahoma, Oregon, Pennsylvania, Rhode Island, South Carolina,\
South Dakota,
Tennessee, Texas, Utah, Vermont, Virginia, Washington, West
Virginia,\
Wisconsin, Wyoming';
return
allStates.split(/,
+/g).map(function
(state) {
return
{
value:
state.toLowerCase(),
display: state
};
});
}
function
createFilterFor(query) {
var
lowercaseQuery = angular.lowercase(query);
return
function
filterFn(state) {
return
(state.value.indexOf(lowercaseQuery) === 0);
};
}
}
Code Explanation:
angular
.module('MyApp', ['ngMaterial', 'ngMessages'])
.controller('AutoCompleteController', AutoCompleteController);
Angular
module named MyApp is made with ngMaterial and ngMessages dependency.
Our
Controller name is AutoCompleteController
function AutoCompleteController() {
var self = this;
self.states = loadAll();
self.querySearch = querySearch;
On
controller load we are calling loadAll function, and querySearch and
stored them to states and querySearch.
function createFilterFor(query) {
var lowercaseQuery = angular.lowercase(query);
return function filterFn(state) {
return (state.value.indexOf(lowercaseQuery) === 0);
};
}
This
filter is used so that our search works for lower and upper case both
and in our return function we are finding those states which has that
search term at index 0. Means the first character.
Our End Result Will be Like :